

LABORATORY HANDBOOK
Video lecture+PDF at the end

Prepared & Designed by:
Md. Imran Nur Manik
Lecturer
Department of Pharmacy

The Four Principles of Safety
Recognize the hazardsof chemicals, equipment, and procedures , requires that you know and recognize the hazards of the chemicals that you are using. What does “aflmmable” mean? What is “toxic” or “corrosive”? And, how will you know if a chemical has any of these properties?
Assess risks of hazardsassociated with exposures and procedures , is perhaps the most important of all the principles. Is this reaction exothermic (releasing energy) in a way that might lead to a fire or explosion? Are there any flammable chemicals involved that might pose a fire hazard? What is the chance of some exposure to a toxic chemical?
Minimize risks, requires careful attention to both the design and execution of an experiment. This requires that you take whatever reasonable steps are necessary to minimize, manage, or eliminate your exposure to a hazard by using good laboratory safety practices.
Finally, despite efforts to prevent incidents (accidents) and exposure in the laboratory, it is prudent to prepare for them.
Rules to Avoid Contamination
Contamination or other problems (e.g. wrong ionic strength or pH) can affect more experiments in the lab if the same materials are shared. Please adhere to the following rules with regard to this issue.
“Use your own stock solutions”
The lab members should not share buffers and other stock solutions (exceptions: proteins and DNA). Each member should prepare and manage his/her own stock solutions.
“Use your own pipettes and pipette-pumps”
The lab members should not share pipettes / pipette-pumps. An exception is for the common pipettes and pumps in the bacterial area, which usually does not require a high precision in volume.
“Do not return an extra material to the original bottle”
When you weigh materials and take a particular amount, please do not return an extra to the original bottle, even if you used a weighing dish or paper. Just dispose the extra.
“Do not insert your pipettes deep into reagent bottles”
Pipettes are very common media for contamination, particularly because they can touch inner surfaces of reagent bottles. When there is a risk that your pipette can directly contact the inside, please transfer a small volume using a long pipette (~5 ml) to a Falcon tube first, and then use the pipette and a tip to take a smaller volume.
Causes of laboratory accidents
1. Thoughtless, ignorant or hurried behaviour may lead to an accident and possible harm to themselves or to others.
2. Reluctance of what is going on around the lab and lack of awareness of the possible dangers arising from the work of others as well as from own experiments.
3. Attempts to obtain results in too great a hurry.
4. Unattended Operations and Working Alone
5. Unnecessary distraction of others.
6. Students’ mischievous behaviour of pouring chemicals on others. E.g. Concentrated sulphuric acid, phenol and sodium hydroxide are the most common harmful chemicals involved.
7. Carelessness in handling hot objects (e.g. Tripods, glassware, metal rods/plates, crucibles or combustion spoons), hot liquids, Bunsen flame or lighted matches.
8. Students unintentionally rubbing of their eyes with hands contaminated with chemicals. E.g. The chemicals commonly involved are Copper (II) Sulphate, dilute acids and alkalis.
Summary
• Lack of “working understanding” of hazards
• Improper or unintended use of equipment or reagents
• Inexperienced scientist
• Distractions, lack/loss of attention to task
• Broken, damaged glassware or equipment
GENERAL PRECAUTIONS
The following are some general precautions concerning laboratory safety. These may serve as guidelines from which schools can work out a set of laboratory rules to be followed by every laboratory user, as well as to equip laboratories with necessary safety facilities/equipment. School should communicate safety precautions to laboratory users through effective means e.g. posters, signage where appropriate.
Students’ Discipline in the Laboratory
1. Students should follow strictly the instructions given by the teacher.
2. Students should not enter the laboratory unless a teacher is present.
3. Students should not remove anything from the laboratory without permission.
4. Students should not rush around or play in the laboratory.
5. Experiments under way should not be left unattended.
6. Laboratory reagents and chemicals should be returned to the appropriate places
immediately after use, with their labels facing the front.
immediately after use, with their labels facing the front.
7. Students should immediately report all accidents and breakages to their teacher.
8. Students should not suck fingers or pencils when in the laboratory since these may be contaminated with chemicals as well as germs.
Personal Precautions to be taken by All Laboratory Users
- Always work in properly-ventilated areas.
- Eating, drinking and smoking are strictly forbidden in the laboratory and preparation room.
- Do not chew gum, drink, or eat while working in the lab.
- Laboratory glassware should never be utilized as food or beverage containers.
- Never smell or taste chemicals.
- Long hair, loose ties or other loose clothing items must be properly secured.
- It is not recommended that students wear contact lenses in the laboratory areas.
Wearing contact lenses in the laboratory is discouraged and requires extra precaution if worn. Gases and vapors can be concentrated under the lenses and cause permanent eye damage. Furthermore, in the event of a chemical splash into an eye, it is often nearly impossible to remove the contact lens to irrigate the eye because of involuntary spasm of the eyelid. Persons who must wear contact lenses should inform their supervisor to determine which procedures would require wearing no-vent goggles.
- Special care is needed when handling chemicals. It is important to foresee the potential hazards in each case and to take the proper precautions.
- Wash hands after experiments, especially those involving the use of chemicals, living organisms and radioactive substances.
- To avoid the possibility of allergy, extra care should be taken when handling pollen and fur.
- Pipette fillers should always be used to help transfer liquid chemicals. Mouth pipetting is strictly forbidden.
- If syringes are used for measuring or transferring liquid, needles should not be used, if possible.
If needles are used, special precautions should be taken to prevent injury. - Heavy objects should be lifted with correct posture. Ask others for assistance whenever necessary. When carrying heavy objects, especially large bottles containing dangerous substances, an appropriate carrier or trolley should be used as far as possible.
- Each time you use glassware, be sure to check it for chips and cracks. Notify your lab supervisor of any damaged glassware so it can be properly disposed of.
- Never use lab equipment that you are not approved or trained by your supervisor to operate.
- If an instrument or piece of equipment fails during use, or isn't operating properly, report the issue to a technician right away. Never try to repair an equipment problem on your own.
- If you are the last person to leave the lab, make sure to lock all the doors and turn off all ignition sources.
- Do not work alone in the lab.
- Never leave an ongoing experiment unattended.
- Never lift any glassware, solutions, or other types of apparatus above eye level.
- If you have been injured, yell out immediately and as loud as you can to ensure you get help.
- In the event of a chemical splashing into your eye(s) or on your skin, immediately flush the affected area(s) with running water for at least 20 minutes.
- If you notice any unsafe conditions in the lab, let your supervisor know as soon as possible.
Housekeeping safety rules
Laboratory housekeeping rules also apply to most facilities and deal with the basic upkeep, tidiness, and maintenance of a safe laboratory.
- Always keep your work area(s) tidy and clean.
- Make sure that all eye wash stations, emergency showers, fire extinguishers, and exits are always unobstructed and accessible.
- Only materials you require for your work should be kept in your work area. Everything else should be stored safely out of the way.
- Only lightweight items should be stored on top of cabinets; heavier items should always be kept at the bottom.
- Solids should always be kept out of the laboratory sink.
- Any equipment that requires air flow or ventilation to prevent overheating should always be kept clear.
Dress code safety rules
As you’d expect, laboratory dress codes set a clear policy for the clothing employees should avoid wearing in order to prevent accidents or injuries in the lab. For example skirts and shorts might be nice for enjoying the warm weather outside, but quickly become a liability in the lab where skin can be exposed to heat or dangerous chemicals.
- Always tie back hair that is chin-length or longer.
- Make sure that loose clothing or dangling jewellery is secured, or avoid wearing it in the first place.
- Never wear sandals or other open-toed shoes in the lab. Footwear should always cover the foot completely.
- Never wear shorts or skirts in the lab.
- When working with Bunsen burners, lighted splints, matches, etc., acrylic nails are not allowed.
Personal protection safety rules
Unlike laboratory dress code policies, rules for personal protection cover what employees should be wearing in the lab in order to protect themselves from various hazards, as well as basic hygiene rules to follow to avoid any sort of contamination.
- When working with equipment, hazardous materials, glassware, heat, and/or chemicals, always wear face shields or safety glasses.
- When handling any toxic or hazardous agent, always wear the appropriate gloves.
- When performing laboratory experiments, you should always wear a smock or lab coat.
- Before leaving the lab or eating, always wash your hands.
- After performing an experiment, you should always wash your hands with soap and water.
- When using lab equipment and chemicals, be sure to keep your hands away from your body, mouth, eyes, and face.
Chemical safety rules
Since almost every lab uses chemicals of some sort, chemical safety rules are a must. Following these policies helps employees avoid spills and other accidents, as well as damage to the environment outside of the lab. These rules also set a clear procedure for employees to follow in the event that a spill does occur, in order to ensure it is cleaned up properly and injuries are avoided.
- Every chemical should be treated as though it were dangerous.
- Do not allow any solvent to come into contact with your skin.
- All chemicals should always be clearly labeled with the name of the substance, its concentration, the date it was received, and the name of the person responsible for it.
- Before removing any of the contents from a chemical bottle, read the label twice.
- Never take more chemicals from a bottle than you need for your work.
- Do not put unused chemicals back into their original container.
- Chemicals or other materials should never be taken out of the laboratory.
- Chemicals should never be mixed in sink drains.
- Flammable and volatile chemicals should only be used in a fume hood.
- If a chemical spill occurs, clean it up right away.
- Ensure that all chemical waste is disposed of properly.
Chemical Safety Precautions
- Safety glasses are to be worn whenever working with acids, bases, or any flammable materials.
- Let the instructor know immediately about any glassware breakage or chemical spills that may occur so that proper cleanup procedures can be instituted.
- Use pipet fillers whenever pipeting any fluid.Whenever working with acids or bases, have the chemicals available at your work station, do not carry pipets with fluid across the room.
- When diluting acids, pour the acid into the water, NOT water into acid as this may cause spattering of the acid.
- When acid is mixed with another reagent, an exothermic reaction may occur which heats up the container, This is natural, so do not panic and spill contents.
- All volatile materials must be handled in a hood with the exhaust fan on.When refluxing any solutions, perform this operation under a hood, and use boiling beads in the reflux vessel to prevent any excessive "bumping" and possible glass breakage.
- Use heat-resistant gloves and/or tongs when handling hot glassware, chinaware, etc.
- Use plastic gloves when handling any hazardous materials to prevent skin contact.
- Label and date all chemical mixtures that are made up and kept for future use.
- Do not store basic solutions in glass containers with glass stoppers, use plastic or rubber stoppers.
- Dispose of all used solutions in an approved manner as directed by the instructor.
- Empty all used inoculated bacteriological media from test tubes or dishes into a designated container so that it may be sterilized before disposal.
- Before leaving, turn off all power and heat to the apparatus you have used, or place in the standby mode.
- Clean all spatulas, glassware, and dishes after use and before storage to prevent contamination.
- Return all chemicals you are using to their proper storage space.Be familiar with the use of the eye-wash, the laboratory shower (if equipped), and the first-aid kit if they are needed at any time
Chemistry lab safety rules
As chemistry labs are one of the most common types, these basic chemistry lab safety rules are relevant to many scientists, dealing with the safe performance of common activities and tasks in the average chemistry lab:
- Before you start an experiment, make sure you are fully aware of the hazards of the materials you'll be using.
- When refluxing, distilling, or transferring volatile liquids, always exercise extreme caution.
- Always pour chemicals from large containers to smaller ones.
- Never pour chemicals that have been used back into the stock container.
- Never tap flasks that are under vacuum.
- Chemicals should never be mixed, measured, or heated in front of your face.
- Water should not be poured into concentrated acid. Instead, pour acid slowly into water while stirring constantly. In many cases, mixing acid with water is exothermic.
Electrical safety rules
Like almost every other workplace, laboratories contain electronic equipment. Electrical safety rules help prevent the misuse of electronic instruments, electric shocks and other injuries, and ensure that any damaged equipment, cords, or plugs are reported to the appropriate authorities so they can be repaired or replaced.
- Before using any high voltage equipment (voltages above 50Vrms ac and 50V dc), make sure you get permission from your lab supervisor.
- High voltage equipment should never be changed or modified in any way.
- Always turn off a high voltage power supply when you are attaching it.
- Use only one hand if you need to adjust any high voltage equipment. It's safest to place your other hand either behind your back or in a pocket.
- Make sure all electrical panels are unobstructed and easily accessible.
- Whenever you can, avoid using extension cords.
A List of Chemistry Laboratory Apparatus and Their Uses
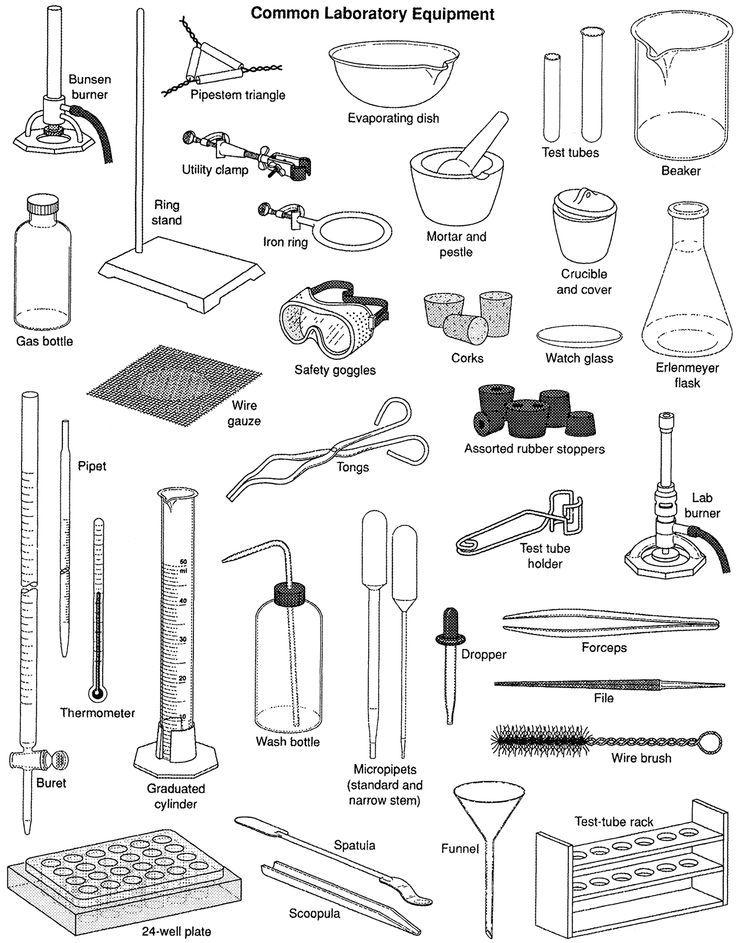
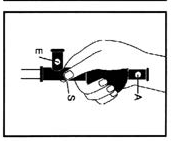
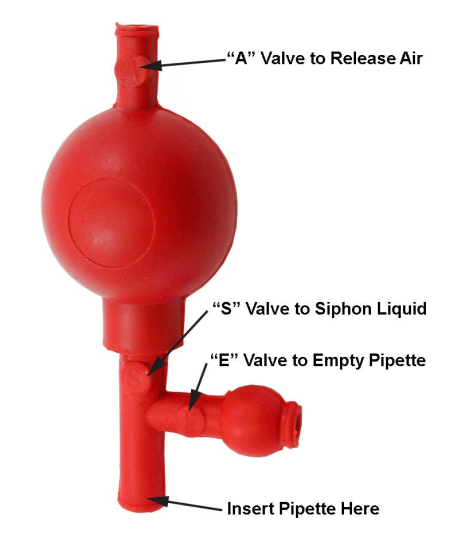
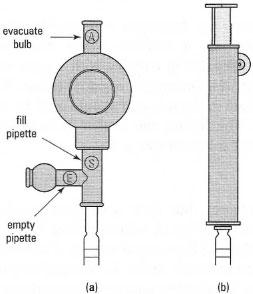
Pipette Filler Instructions
Use this rubber bulb pipette filler to safely fill glass and plastic pipettes. The three‐valve design allows you to release air, draw liquid into the pipette, and accurately release liquid. It works with all sizes of Mohrs, serological, or volumetric pipettes, except for 1ml and smaller plastic pipettes.
- Release air from the pipette filler by squeezing valve “A” on the top of the pipette filler while simultaneously squeezing the bulb. The amount of air you release is dependent on the size of the pipette you are using release more air for larger volume pipettes. Release control pad (A); bulb remains depressed.

- Insert the tip of the pipette into the liquid to be dispensed. Siphon liquid into the pipette to the desired level by squeezing valve “S” on the bottom of the pipette filler. This uses the vacuum created in the bulb to draw liquid into the pipette. Be careful not to draw liquid into the pipette filler.

- Empty the pipette by squeezing valve “E” on the side‐tube. This allows you to release liquid at the desired rate and to the desired level.

- To dispense under pressure, squeeze pad (A), allowing the bulb to re-inflate, then press pad (S) while squeezing bulb to dispense.
It works best to fill the pipette past the zero mark on step 2(valve “S”) and then draw the level down to the zero mark on step 3 (valve “E”). Once the pipette is filled to the level desired the contents can be dispensed using valve “E”.

Balances

A balance is used to weigh chemicals. The chemicals are always in some form of container and never placed directly on the balance. It is important not to move a balance because they have been calibrated for the exact position they are in. Some balances have plastic housing with small doors to keep air currents from affecting the measurement. Close these doors whenever the balance is in use.
To use a balance to determine the weight of a chemical, first put the empty container that the chemical will be in on the balance. Once you have a reading, press the "tare" or "zero" button on the balance. Remove the container from the balance and add the chemical (never add chemicals to a container while it is on the balance). Reweigh after adding the chemical to find the weight of only the chemical.
It is important to keep the balance clean.
What method of measuring should you use?
HOW TO GET THE BEST RESULTS IN LABORATORY EXPERIMENTS
Dear students, here is some key points hope to be helpful for your effort to get best outcomes during your laboratory experiments.
- Before commencement of the lab, [go through the lab manual to] get a clear understanding of each and every step of the experiment(s).
- After complete understanding of the theory, start your experiment(s) step wise, as per the laboratory manual.
- Always take notes of your findings.
- Get help from your instructor while interpreting your findings
- Calculate the amount of chemical(s), required to make reagent solution(s) with great accuracy and precision.
- Prepare all types of solution with great nicety.
- Always use clean and dry apparatus, both for the preparation of reagent solutions and experimental purpose.
- Always label each reagent (bottles/ containers), after preparation.
- Labeling must contain :
- Name
- Concentration
- Date of preparation
- Use permanent marker or Paper (PAPER must be attached with adhesive to the bottle) for labeling.
- Conscientiously add all types of reagents throughout the experiments.
- Always use separate dropper for separate reagents.
- Do not mix droppers.
- Never use single dropper for all types of reagents. If requires so, then clean thoroughly before using for every new reagents.
- Take Data During Lab
Always record information during a lab and not after lab--on the assumption that it will be neater. Put data directly in your lab book rather than transcribing from another source (i.e.: notebook or lab partner).
There are lots of reasons for this, but the practical one is that it is much harder for the data to get lost in your lab book. For some experiments, it may be helpful to take data before lab.
We're not telling you to dry-lab or cheat, but being able to project likely data will help you catch bad lab procedure before you are three hours or so into a project. Know what to expect. You should always read the experiment in advance.
- Always Follow the Instructions
Your instructor and lab manuals are your best resources when setting up. Always listen and read carefully. Don't start a lab until you know all of the steps, from start to finish. If you have questions about any part of a procedure, get the answer before starting.
- Don't Play Mad Scientist
Don't haphazardly mix chemicals! Pay attention to the order in which chemicals are to be added to each other and do not deviate from the instructions. Even chemicals that mix to produce seemingly safe products should be handled carefully.
For example, hydrochloric acid and sodium hydroxide will give you salt water, but the reaction could break your glassware or splash the reactants onto you if you aren't careful!
PDF DOWNLOAD LINK-01
PDF DOWNLOAD LINK-02